
해당 가이드는 솔루션 도입 과정에서 가장 많이 활용하는 기능을 기준으로 함축된 내용을 제공합니다. 가이드에서 제공되지 않은 기능은 Amplitude 공식 문서를 통해 확인 부탁드립니다.
데이터 전송 프로세스
Amplitude에서의 데이터 전송 프로세스는 Native/Hybrid 영역은 각각의 SDK 탑재를 통해 진행합니다.
Hybrid 영역은 앱/웹 분기처리하지 않으며, 모든 플랫폼에 SDK를 탑재합니다.
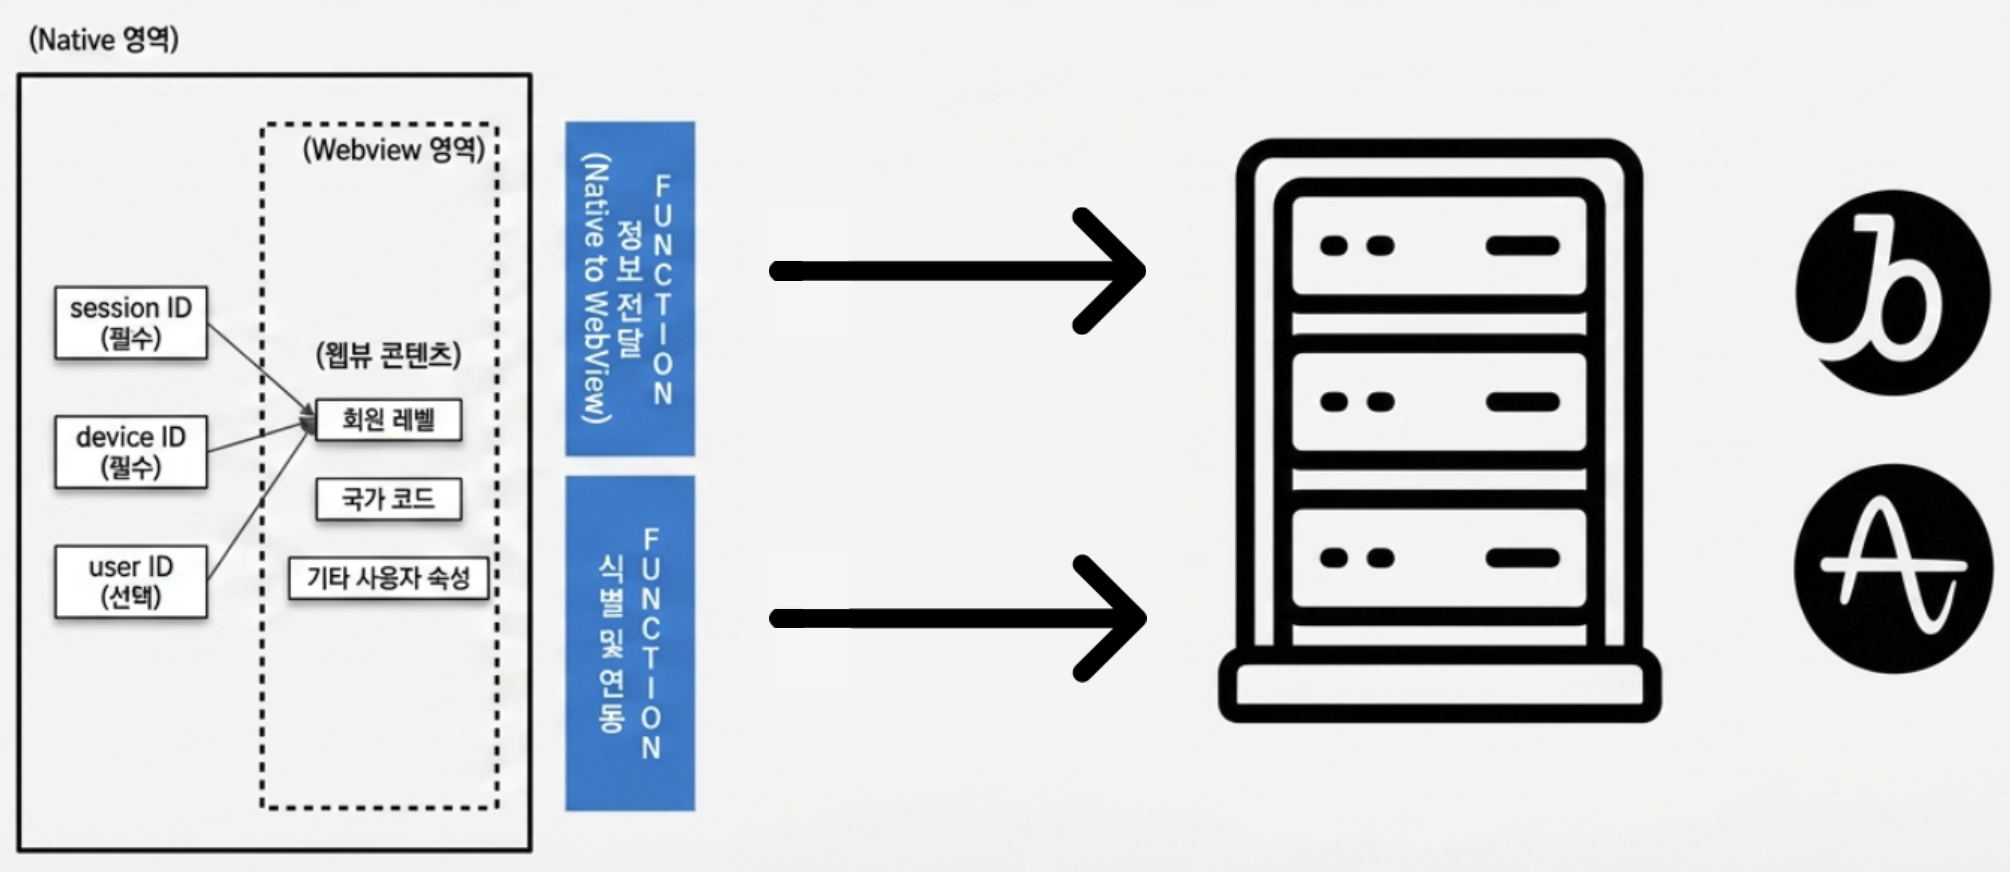
네이티브 SDK와 WEB SDK를 WebView에 동시에 탑재하면 동일 사용자가 중복 집계될 수 있습니다. WebView에서는 네이티브에서 전달한 ID로 WEB SDK만 초기화하는 패턴으로 구성되도록 개발되어야 합니다.
SDK 설치
Amplitude Android(Kotlin) SDK를 프로젝트에 추가합니다.
대시보드에서 API Key 확인
Amplitude Data → Sources → Android Source를 선택하면 Source Settings에서 API Key를 확인할 수 있습니다.
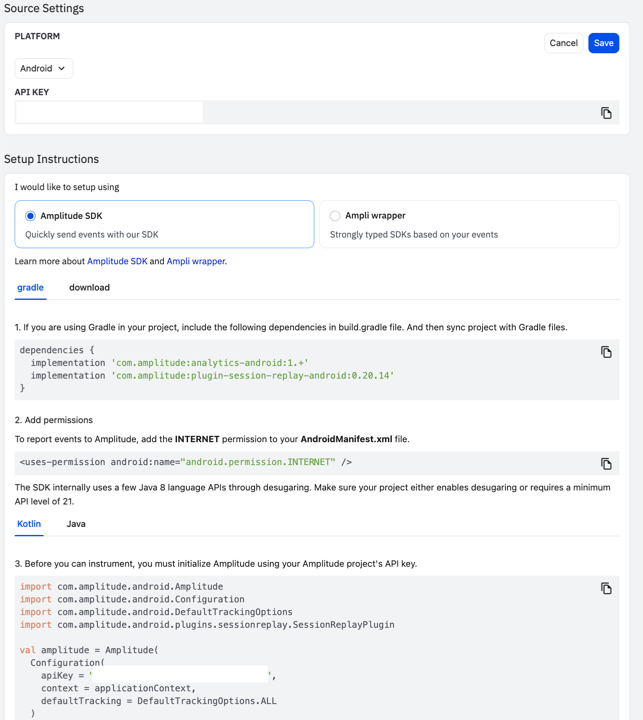
- Android 프로젝트
build.gradle에 의존성을 추가합니다. AndroidManifest.xml에 인터넷 권한을 선언합니다.- Application 클래스에서 Amplitude API Key로 초기화합니다.
build.gradle
dependencies {
    implementation 'com.amplitude:analytics-android:1.+'
}
권장 최신 SDK를 1.+ 등으로 동적으로 참조하기보다, 고정 버전을 명시해 사용하세요. SDK는 6개월 주기로 버전 업데이트·호환성 검토를 권장드립니다.
AndroidManifest.xml
<uses-permission android:name="android.permission.INTERNET" />Application class — 초기화 예시
autocapture: session, appLifecycles, screen view, network element interaction, frustration interaction 등을 개별 설정할 수 있습니다.
import com.amplitude.android.Amplitude

val amplitude = Amplitude(
  Configuration(
    apiKey = AMPLITUDE_API_KEY,
    context = applicationContext,
    autocapture = autocaptureOptions {
      +sessions // or `+AutocaptureOption.SESSIONS`
    }
  )
)
import com.amplitude.android.Amplitude;
import com.amplitude.android.Configuration;
import com.amplitude.android.AutocaptureOption;
Configuration configuration = new Configuration(AMPLITUDE_API_KEY, getApplicationContext());
configuration.getAutocapture().add(AutocaptureOption.SESSIONS);
Amplitude amplitude = new Amplitude(configuration);SDK 최신 설치: Android-Kotlin SDK 공식 문서
초기 설정
Configuration 객체로 SDK 동작을 설정합니다. 이벤트 전송 전 초기화가 완료되어야 합니다.
아래 코드 예시는 Kotlin / Java 탭으로 전환할 수 있습니다.
주요 Configuration 옵션
| 옵션 | 설명 | 기본값 |
|---|---|---|
instanceName | SDK 인스턴스 이름 | default instance |
storageProvider | 로컬 저장소 (Persistent Storage) | — |
logLevel | SDK verbose 로그 | LogLevelEnum.WARN |
loggerProvider | 커스텀 로거 | ConsoleLogger |
flushIntervalMillis | Queue 업로드 주기(ms) | 30000 |
flushQueueSize | 한 번에 전송할 이벤트 수 | 30 |
flushMaxRetries | 전송 실패 재시도 | 5 |
minIdLength | userId·deviceId 최소 길이 | 5 |
identifyBatchIntervalMillis | Identify 배치 주기 | 30000 |
flushEventsOnClose | 앱 종료 시 flush | true |
useBatch | Batch API 사용 | false |
trackingOptions | SDK 자동 수집 옵션 | enable |
USER ID
- Amplitude SDK 연동 시 device ID가 자동 생성됩니다.
- 로그인 시점에는 User ID를 설정합니다.
- 로그인 전·후 시점에 따라 Amplitude 데이터는 머지됩니다.
amplitude.setUserId("로그인 사용자 식별 값")amplitude.setUserId("로그인 사용자 식별 값");Event
- 이벤트는 이벤트명과 이벤트 속성(Map)으로 구성됩니다.
아래 코드는 샘플이며, 실제 값은 텍소노미 기획 문서 기준으로 적용하세요.
amplitude.track("텍소노미에 정의된 이벤트명")

amplitude.track(
    "텍소노미에 정의된 이벤트명",
    mutableMapOf<String, Any?>("텍소노미에 정의된 이벤트 속성명" to "값")
)
amplitude.track("텍소노미에 정의된 이벤트명");
amplitude.track(
"텍소노미에 정의된 이벤트명",
java.util.Collections.singletonMap("텍소노미에 정의된 이벤트 속성명", "값")
);User Property
identifyAPI와Identify객체로 User Property를 설정합니다.set,setOnce,add,remove,append등을 지원합니다.
아래 코드는 샘플이며, 실제 값은 텍소노미 기획 문서 기준으로 적용하세요.
Identify — set
val identify = Identify()
identify.set("설정할 사용자 속성명(String)", "저장할 사용자 속성 값")
amplitude.identify(identify)
Identify identify = new Identify();
identify.set("설정할 사용자 속성명(String)", "저장할 사용자 속성 값");
amplitude.identify(identify);Identify — setOnce
val identify = Identify()
identify.setOnce("설정할 사용자 속성명(String)", "저장할 사용자 속성 값")
amplitude.identify(identify)
Identify identify = new Identify();
identify.setOnce("설정할 사용자 속성명(String)", "저장할 사용자 속성 값");
amplitude.identify(identify);Identify — add
val identify = Identify()
identify.add("설정할 사용자 속성명(Number)", 숫자값)
amplitude.identify(identify)
Identify identify = new Identify();
identify.add("설정할 사용자 속성명(Number)", 숫자값);
amplitude.identify(identify);Identify — remove / append
val identify = Identify()
identify.remove("설정할 사용자 속성명(String)", "저장할 사용자 속성 값")
amplitude.identify(identify)

val identify2 = Identify()
identify2.append("설정할 사용자 속성명(Array)", "배열 속성 값")
amplitude.identify(identify2)
Identify identify = new Identify();
identify.remove("설정할 사용자 속성명(String)", "저장할 사용자 속성 값");
amplitude.identify(identify);
Identify identify2 = new Identify();
identify2.append("설정할 사용자 속성명(Array)", "배열 속성 값");
amplitude.identify(identify2);Ecommerce Data
매출·구매는 Revenue 객체로, 장바구니·상품 데이터는 Cart object array로 전송합니다.
Cart Analysis 차트 활용을 위해 object array 전송과 Revenue를 함께 사용하는 것을 권장합니다.
(공식 — Send the cart object array)
Cart object array 전송
products와 같이 상품 목록을 담는 object array를 User Property 또는 Event Property로 전송합니다.
수집 후 Amplitude Data에서 해당 속성의 Property splitting(Type: Array, Item type: Any)을 활성화해야 Cart Analysis에서 분석할 수 있습니다.
① Identify API — set() / append()
val identify = Identify()
identify.append(
  "products",
  listOf(
    mapOf(
      "product_id" to 123,
      "sku" to "41245",
      "name" to "Sunscreen",
      "category" to "beauty",
      "price" to 12.6
    )
  )
)
amplitude.identify(identify)
import java.util.Arrays;
import java.util.HashMap;
Identify identify = new Identify();
HashMap<String, Object> product = new HashMap<>();
product.put("product_id", 123);
product.put("sku", "41245");
product.put("name", "Sunscreen");
product.put("category", "beauty");
product.put("price", 12.6);
identify.append("products", Arrays.asList(product));
amplitude.identify(identify);② Event Property — track
amplitude.track(
  "Product Viewed",
  mapOf(
    "products" to listOf(
      mapOf(
        "product_id" to 123,
        "sku" to "41245",
        "name" to "Sunscreen",
        "category" to "beauty",
        "price" to 12.6
      )
    )
  )
)
import java.util.Arrays;
import java.util.HashMap;
HashMap<String, Object> product = new HashMap<>();
product.put("product_id", 123);
product.put("sku", "41245");
product.put("name", "Sunscreen");
product.put("category", "beauty");
product.put("price", 12.6);
HashMap<String, Object> props = new HashMap<>();
props.put("products", Arrays.asList(product));
amplitude.track("Product Viewed", props);Revenue 전송
구매 이벤트 속성 (옵션)
| 속성 | 설명 |
|---|---|
revenueType | 매출 유형 (구매, 환불, 취소 등) |
receipt | 영수증 |
receiptSignature | 영수증 서명 |
eventProperties | 구매 이벤트 속성 (예: 상품명, 가격, 수량, 통화 등) |
val revenue = Revenue()
revenue.productId = "텍소노미에 정의된 상품 ID"
revenue.price = 5000
revenue.quantity = 3
revenue.revenueType = "purchase"
amplitude.revenue(revenue)
Revenue revenue = new Revenue();
revenue.productId = "텍소노미에 정의된 상품 ID";
revenue.price = 5000;
revenue.quantity = 3;
revenue.revenueType = "purchase";
amplitude.revenue(revenue);하이브리드
네이티브에서 WebView로 userId, deviceId, sessionId를 User-Agent에 실어 WEB SDK가 초기화할 수 있도록 합니다.
// 웹뷰 로드 직전 설정
val userId = amplitude.userId
val deviceId = amplitude.deviceId
val sessionId = amplitude.sessionId?.toString()
webView.settings.userAgentString =
    "${webView.settings.userAgentString.orEmpty()}/MaxonomyAndroid/$userId/$deviceId/$sessionId"
// 웹뷰 로드 직전 설정
String userId = amplitude.getUserId();
String deviceId = amplitude.getDeviceId();
Long sessionId = amplitude.getSessionId();
String baseUa = webView.getSettings().getUserAgentString();
webView.getSettings().setUserAgentString(
baseUa + "/MaxonomyAndroid/" + userId + "/" + deviceId + "/" + sessionId
);최종 반영 예시 코드
아래는 연동 완료 시 실제 서비스에 반영되어야 하는 예시 코드 패턴입니다.
SDK 초기화뿐 아니라 User Property·Event 태깅 예시를 함께 정리했습니다.
Application — Initialize
val amplitude = Amplitude(
  Configuration(
    apiKey = AMPLITUDE_API_KEY,
    context = applicationContext,
    autocapture = autocaptureOptions { +sessions }
  )
)
amplitude.setUserId("사용자 ID")
Configuration configuration = new Configuration(AMPLITUDE_API_KEY, getApplicationContext());
configuration.getAutocapture().add(AutocaptureOption.SESSIONS);
Amplitude amplitude = new Amplitude(configuration);
amplitude.setUserId("사용자 ID");WebView — 하이브리드 (User-Agent)
WebView 로드 직전 네이티브 SDK의 ID를 User-Agent에 실어 WEB SDK가 동일 사용자·세션으로 초기화할 수 있도록 합니다. (하이브리드 · WEB 가이드 참고)
// 웹뷰 로드 직전 설정
val userId = amplitude.userId
val deviceId = amplitude.deviceId
val sessionId = amplitude.sessionId?.toString()
webView.settings.userAgentString =
    "${webView.settings.userAgentString.orEmpty()}/MaxonomyAndroid/$userId/$deviceId/$sessionId"
// 웹뷰 로드 직전 설정
String userId = amplitude.getUserId();
String deviceId = amplitude.getDeviceId();
Long sessionId = amplitude.getSessionId();
String baseUa = webView.getSettings().getUserAgentString();
webView.getSettings().setUserAgentString(
baseUa + "/MaxonomyAndroid/" + userId + "/" + deviceId + "/" + sessionId
);WebView — WEB SDK 초기화 (하이브리드)
중요: WEB SDK 플러그인은 amplitude.init() 전에 등록해야 합니다.
(WEB 최종 반영 예시 참고)
<script>
  try {
    if (userAgent.indexOf('MaxonomyAndroid') > -1 || userAgent.indexOf('MaxonomyiOS') > -1) {
      amplitude.init("API_KEY", {
        deviceId: UserAgent에_담긴_deviceID,
        sessionId: UserAgent에_담긴_sessionID,
        userId: UserAgent에_담긴_userID,
        autocapture: false
      });
    }
  } catch (e) {
    console.log("Hybrid Errror : " + e);
  }
</script>
User Property · Event 태깅
중요: 이벤트명·속성명·User Property 키/값은 텍소노미 기획 문서에 정의된 명세로 교체하여 적용해 주세요.
val identify = Identify()
  .set("membership_level", "gold")
  .set("country_code", "KR")
amplitude.identify(identify)

amplitude.track(
  "login_completed",
  mutableMapOf(
    "login_method" to "kakao",
    "is_first_login" to false
  )
)
Identify identify = new Identify()
.set("membership_level", "gold")
.set("country_code", "KR");
amplitude.identify(identify);
HashMap<String, Object> props = new HashMap<>();
props.put("login_method", "kakao");
props.put("is_first_login", false);
amplitude.track("login_completed", props);UTM 태깅 (APP)
APP의 UTM 수집·집계는 Browser SDK와 동일한 원칙을 따릅니다.
Android에서는 Enrichment Plugin으로 세션 전환 시 UTM User Property를 초기화하고,
딥링크·App Links 진입 시 intent URI의 UTM 파라미터를 identify로 반영합니다.
1. Enrichment Plugin — 세션 시작·종료 시 UTM 초기화
앱 최초 실행 시점에 UTM 유입 여부를 항상 판단하기 어렵다는 전제에서,
session_start / session_end마다 UTM 관련 User Property를 $unset으로 초기화하는 패턴을 권장합니다.
참고 고객사에서 앱 접속 시점에 UTM 유입을 스스로 판단할 수 있다면, 초기화 처리뿐만 아니라 UTM 갱신(업데이트) 로직을 함께 설계할 수 있습니다.
import com.amplitude.android.Amplitude
import com.amplitude.android.plugins.EventPlugin
import com.amplitude.android.plugins.Plugin
import com.amplitude.core.events.BaseEvent
import com.amplitude.core.events.GroupIdentifyEvent
import com.amplitude.core.events.IdentifyEvent
import com.amplitude.core.events.RevenueEvent

class EnrichmentPlugin : Plugin, EventPlugin {
    override lateinit var amplitude: Amplitude
    override val type: Plugin.Type = Plugin.Type.ENRICHMENT

    override fun setup(amplitude: Amplitude) {
        this.amplitude = amplitude
    }

    override fun execute(event: BaseEvent): BaseEvent {
        return event
    }

    override fun track(event: BaseEvent): BaseEvent {
        if (event.eventType == "session_start" || event.eventType == "session_end") {
            val props = event.userProperties?.toMutableMap() ?: mutableMapOf()
            props["$unset"] = mapOf(
                "utm_medium" to "-",
                "utm_source" to "-",
                "utm_campaign" to "-",
                "utm_content" to "-",
                "utm_term" to "-",
                "utm_id" to "-"
            )
            event.userProperties = props
        }
        return event
    }

    override fun identify(event: IdentifyEvent): IdentifyEvent = event
    override fun groupIdentify(event: GroupIdentifyEvent): GroupIdentifyEvent = event
    override fun revenue(event: RevenueEvent): RevenueEvent = event
    override fun flush() {}
}
import androidx.annotation.NonNull;
import androidx.annotation.Nullable;
import com.amplitude.android.Amplitude;
import com.amplitude.core.events.BaseEvent;
import com.amplitude.core.platform.Plugin;
import java.util.HashMap;
import java.util.Map;
public class EnrichmentPlugin implements Plugin {
public Amplitude amplitude;
@NonNull
@Override
public Amplitude getAmplitude() { return amplitude; }
@Override
public void setAmplitude(@NonNull Amplitude amplitude) { this.amplitude = amplitude; }
@NonNull
@Override
public Type getType() { return Type.Enrichment; }
@Nullable
@Override
public BaseEvent execute(@NonNull BaseEvent event) {
if ("session_start".equals(event.getEventType()) ||
"session_end".equals(event.getEventType())) {
Map<String, Object> props = event.getUserProperties();
if (props == null) { props = new HashMap<>(); }
Map<String, String> unset = new HashMap<>();
unset.put("utm_medium", "-");
unset.put("utm_source", "-");
unset.put("utm_campaign", "-");
unset.put("utm_content", "-");
unset.put("utm_term", "-");
unset.put("utm_id", "-");
props.put("$unset", unset);
event.setUserProperties(props);
}
return event;
}
@Override
public void setup(@NonNull Amplitude amplitude) { this.amplitude = amplitude; }
}2. Plugin 등록
Application 또는 Activity에서 Amplitude SDK 초기화 직후 Plugin을 등록합니다.
amplitude.add(EnrichmentPlugin())amplitude.add(new EnrichmentPlugin());3. 딥링크 진입 — UTM 태깅
Activity onCreate / onNewIntent에서 intent.data URI의 UTM 쿼리를 파싱해
identify합니다. 최초 유입 값은 setOnce로 initial_*에 보존합니다.
private fun handleDeepLinkUtm(uri: Uri?) {
    val utmKeys = listOf(
        "utm_source", "utm_medium", "utm_campaign",
        "utm_term", "utm_content", "utm_id"
    )
    val identify = Identify()
    var hasUTMData = false

    uri?.let { u ->
        for (key in utmKeys) {
            u.getQueryParameter(key)?.let { value ->
                identify.set(key, value)
                identify.setOnce("initial_$key", value)
                hasUTMData = true
            }
        }
    }

    if (hasUTMData) {
        amplitude.identify(identify)
    }
}

// onCreate / onNewIntent
handleDeepLinkUtm(intent?.data)
private void handleDeepLinkUtm(Uri uri) {
List<String> utmKeys = Arrays.asList(
"utm_source", "utm_medium", "utm_campaign",
"utm_term", "utm_content", "utm_id"
);
Identify identify = new Identify();
boolean hasUTMData = false;
if (uri != null) {
for (String key : utmKeys) {
String value = uri.getQueryParameter(key);
if (value != null) {
identify.set(key, value);
identify.setOnce("initial_" + key, value);
hasUTMData = true;
}
}
}
if (hasUTMData) {
amplitude.identify(identify);
}
}
// onCreate / onNewIntent
handleDeepLinkUtm(getIntent().getData());추가 설정 항목
Amplitude에 한 번 연동된 이후, SDK를 통해 추가 설정을 적용할 수 있습니다.
1. 세션 길이 조정
앱이 백그라운드로 전환된 뒤 세션이 종료되기까지의 대기 시간(minTimeBetweenSessionsMillis)을 조정하는 설정입니다.
WEB과 APP의 세션 주기·타임아웃이 서로 다를 때, 네이티브 앱 기준으로 세션 길이를 맞추기 위해 사용할 수 있습니다.
val amplitude = Amplitude(AMPLITUDE_API_KEY, applicationContext) {
    minTimeBetweenSessionsMillis = 10000
}
2. Device ID 설정 (Braze 연동)
Amplitude deviceId를 Braze device ID와 동일하게 맞추는 코드입니다.
Braze를 함께 사용하는 경우 크로스 분석·동일 사용자 매칭에 활용합니다.
amplitude.setDeviceId("내부 DB에 저장된 고유 ID")
// Braze를 사용하는 고객사라면 크로스 분석을 위해 Braze device ID로 설정하는 것을 권장드립니다.
braze.deviceId?.let { brazeDeviceId ->
    amplitude.setDeviceId(brazeDeviceId)
}
3. Device ID 조회
현재 Amplitude SDK에 설정된 Device ID를 가져오는 코드입니다.
amplitude.getDeviceId()4. Session ID 조회
현재 Amplitude SDK의 Session ID를 가져오는 코드입니다.
val sessionId = amplitude.sessionIdGroup
Group 기능은 유료 기능입니다. 사용을 원하실 경우 별도 세일즈 담당자를 통해 확인이 필요합니다.
Amplitude Group은 사용자(userId)를 회사·계정·조직 등 그룹 단위로 묶어 분석할 때 사용하는 기능입니다.
B2B·멀티 테넌트 서비스처럼 “어떤 고객사(그룹) 소속 사용자가 어떻게 행동하는지”를 보고 싶을 때 활용합니다.
- 한 사용자는 여러 Group에 동시에 속할 수 있습니다.
setGroup으로 사용자를 그룹에 연결하고,groupIdentify로 그룹 단위 속성(Group Property)을 설정합니다.- 이벤트·User Property와 별도로, 그룹 수준의 속성·코호트 분석이 가능합니다.
Group 연결 — setGroup
현재 사용자를 지정한 그룹 타입(groupType)·그룹명(groupName)에 연결합니다.
이후 해당 사용자의 이벤트는 그 Group과 함께 집계·분석됩니다.
amplitude.setGroup("그룹타입", "그룹명")Group Property — groupIdentify
특정 Group에 대한 속성 값(예: 구독일, 플랜 등)을 설정하는 API입니다.
User Property의 identify와 유사하지만, 대상이 그룹입니다.
val groupType = "그룹타입"
val groupName = "그룹명"
val identify = Identify().set("subscribe_date", "2026-04-20")
amplitude.groupIdentify(groupType, groupName, identify)
Session Replay
Amplitude에서는 Session Replay 기능을 제공합니다.
- Session Replay는 세션 동안 수집된 이벤트를 기반으로, 대시보드에서 앱 화면에서의 사용자 행동을 재생해 보여줍니다.
- Android 앱에서 사용하려면 대시보드에서 기능을 활성화한 뒤, Session Replay 플러그인을 추가·연동해야 합니다.
Session Replay는 무료로 10,000 session까지 트래킹됩니다. 상향 트래픽이 필요하신 경우 세일즈 담당자를 통해 문의해 주세요.
Amplitude 대시보드 → Settings → Session Replay & Heatmap 경로에서 기능 활성화가 가능합니다.
의존성 추가
앱 모듈 build.gradle에 Session Replay 플러그인을 추가합니다.
implementation("com.amplitude:plugin-session-replay-android:0.26.1")연동 코드
Amplitude 초기화 후 SessionReplayPlugin을 등록합니다. sampleRate는 세션 녹화 비율, javaScriptEnabled는 WebView 리플레이 호환 설정입니다.
import com.amplitude.android.Amplitude
import com.amplitude.android.Configuration
import com.amplitude.android.plugins.SessionReplayPlugin

val amplitude = Amplitude(
    Configuration(
        apiKey = API_KEY,
        context = applicationContext
    )
)

// 세션 비율 & 웹뷰 리플레이 호환 설정
val sessionReplayPlugin = SessionReplayPlugin(
    sampleRate = 1.0,
    javaScriptEnabled = true
)
amplitude.add(sessionReplayPlugin)
연동 체크리스트
배포 전 아래 항목을 확인하세요. (데이터 검수는 대시보드 Live View·User Lookup을 사용합니다.)
- 프로젝트 API Key가 운영/개발 환경별로 분리되어 있는가
- Application에서 Amplitude SDK가 1회만 초기화되는가
- 로그인 시
setUserId및 필요 시identify가 호출되는가 - Taxonomy(이벤트·속성명)와 코드의
track이벤트명이 일치하는가 Revenue·Ecommerce Data(Cart object array) 속성이 기획과 일치하는가- 하이브리드 WebView에서 User-Agent 설정 및 WEB SDK 이중 수집이 없는가
- UTM 태깅(Enrichment Plugin·딥링크) 연동이 완료되었는가
- Group 기능 사용 시
setGroup·groupIdentify연동이 완료되었는가 (유료 기능) - Session Replay 사용 시 대시보드(Settings → Session Replay & Heatmap) 활성화 및 SDK 플러그인 연동이 완료되었는가
- 배포 전 Live View·User Lookup에서 이벤트·유저 속성이 기대대로 수집되는지 확인했는가